
Straight to Circular
by Jen White
Make your straight elements do double duty by turning them circular. It’s all possible with the Polar Coordinates Filter.
Note: This tutorial was written for Adobe Photoshop and Photoshop Elements.
Step One: Create a Workspace
You’ll need to begin with a square document and a horizontal guide.
- Create a new 12 x 12 inch document (File > New > Blank File) at 300 ppi with a white background. (PS: Choose File > New.)
- In the Menu Bar, choose View > Rulers to turn them on.
- Click and drag a guide from the horizontal ruler to halfway down the page.

Step Two: Add a Straight Element
This tutorial will not work for all kinds of straight elements. Search for things like a line of stitches, a ribbon, a long thin border, or lace. I’ll show some good and bad examples of the technique below.
- Open a straight element (File > Open).
I will be demonstrating this technique with a strip of berries from Mother Is a Verb by Krystal Hartley. Click here to download these berries.
- Get the Move tool.
- In the Tool Options, uncheck Auto-Select Layer.
- Click and drag the berries onto the document.
For Vertical Elements: The element used in this technique must be horizontal. If the element you are using is vertical, in the Menu Bar choose Edit > Transform > Rotate 90˚ Clockwise.

Step Three: Fit the Element to the Document
You can see that these berries do not stretch across the entire width of the page. In order to achieve a full circular element, the element must reach both the left and right sides of the document.
Here are two options for doing that:
Option 1—Transform
- Press Ctrl T (Mac: Cmd T) to get the Transform options.
- On the document, click and drag the corner handles of the bounding box until the bounding box extends past the edges of the document. (PS: Hold down the Shift key while dragging.)
Note: Do not stretch the element out of proportion.

- Click the checkmark to commit the change.
Option 2—Duplicate
- Get the Move tool.
- On the document, click and drag the berries so they are slightly off the left side of the document.

- Press Ctrl J (Mac: Cmd J) to create a duplicate of the berries layer.
- In the Menu Bar, choose Edit > Transform > Rotate 180˚.
- On the document, click and drag the berries so they are connecting end to end exactly with the first strip.
TIP: You may need to zoom in (Ctrl/Cmd +) and use your Arrow keys to get the two ends to line up exactly.

- Press Ctrl 0 (Mac: Cmd 0) to zoom out.
- In the Menu Bar, choose Layer > Merge down.
Now you should have one long strip of berries.

- Press Ctrl T (Mac: Cmd T) to get the Transform options.
- Press Ctrl 0 (Mac: Cmd 0) to zoom out so you can see the entire bounding box.
- On the document, click and drag the corner handles of the bounding box until the bounding box extends a little past the edges of the document. (PS: Hold down the Shift key while dragging.)
Note: Do not stretch the element out of proportion.

Step Four: Align the Ends of the Element
In order for the element to transform into a closed circle, the ends have to be at the exact same vertical position. Here’s how to do that using the guide.
- Press Ctrl T (Mac: Cmd T) to get the Transform options.
- On the document, click and drag inside the bounding box until the stem of the berries lies up with the guide.
- Zoom (Ctrl/Cmd +) into the left end of the strip of berries.
- Use the Up and Down Arrow keys to exactly align the top of the stem to the top of the guide.
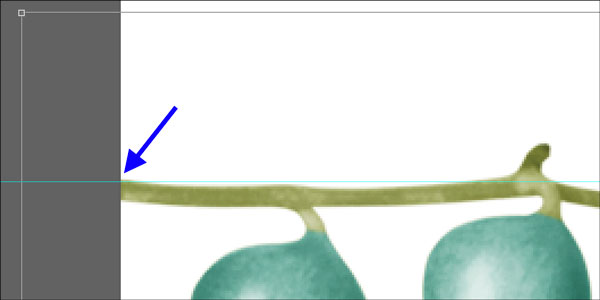
- Holding down the Alt key (Mac: Opt key), click on the intersection where the left side of the document meets the guide.
This will set the position of the pivot point for the bounding box.

- Hold down the Space bar and click and drag on the document to reposition the zoom to the right side of the document.
- Hover your cursor near the edge of the bounding box until you see a curved double-sided arrow. Click and drag to rotate the bounding box until the top edge of the stem is even with the guide.
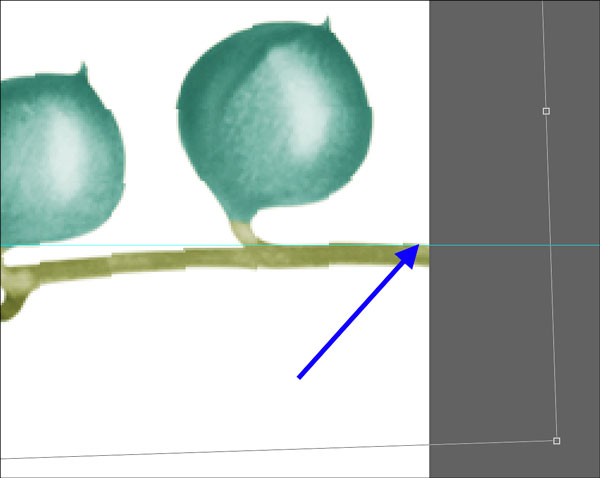
- Click the checkmark to commit.
- Press Ctrl 0 (Mac: Cmd 0) to zoom out.
Both ends of the stem of the berries should now be aligned with the guide.
Note: It does not matter if the rest of the element is on the guide. Only the ends matter.

Step Five: Crop the Document
- Press Ctrl A (Mac: Cmd A) to select the entire document.
- In the Menu Bar, choose Image > Crop.
- Press Ctrl D (Mac: Cmd D) to deselect.
Step Six: Run the Polar Coordinates Filter
- Press Ctrl T (Mac: Cmd T) to get the Transform options.
- In the Tool Options, uncheck Maintain Proportions. (PS: Maintain Proportions is turned off by default.)
- Set the Height to 300% and click the checkmark to commit.

- In the Menu Bar, choose Filter > Distort > Polar Coordinates.
- In the dialog box, check Rectangular to Polar and click OK.

Now the berries should be in the form of a complete and connecting circle. Notice in the closeup how the ends connect perfectly.
Step Seven: Save As a Unique File
- In the Menu Bar, choose File > Save As.
- Enter a unique name and save as a PNG file.
- Close the original files without saving.
Here are a couple other examples of what works well with this technique.


Here is how I used the rounded berry string on a card.

Credits
Card: Happy Mother’s Day by Jen White
Kits: Mother Is A Verb by Krystal Hartley, Christmas Past by Susan Bartolini (tag only)
Font: Afta sans
Download the PDF Manual for this tutorial.
